Tuesday, December 22, 2009
Flicker test
However, there is some concern that there will be flickering when filming under fluorescent light at certain shutter speed since the mains frequency in PAL land is 50hz against 60hz in NTSC area. Actually I do not notice any flickering in my videos, maybe because most lighting now uses the energy saving bulb or the shutter speeds used by the HD2000 during filming do not result in any flicker or only slightly.
Anyway, at the request of one of my readers, Sergei, I made some short clips using the various shutter speeds that could be set manually. The shutter speeds that can be set manually are the following:
4s, 2s, 1s, 1/2s, 1/4s, 1/8s, 1/15s, 1/30s, 1/60s, 1/100s, 1/125s, 1/250s, 1/500s and 1/1000s.
However, according to the user manual, the lowest speed that would be used in the normal video mode is 1/30s and 1/15s in the high sensitivity (or lamp) mode. The highest speed possible is an astonishing 1/10,000s and I suppose this is seldom used in practice, if at all.
So what is the result of my test? You can see the result in the video below. This is a combined video of 7 clips of about 6-7 seconds each using increasing shutter speeds of 1/30, 1/60, 1/100, 1/125, 1/250, 1/500 and 1/1000 in this order. These were all shot using resolution of 1920x1080, 30fps (30p) and uploaded to Youtube as is without any rendering.
It shows that there is flicker, especially at the higher shutter speeds. There is slight flickering at 1/30 (very close to the light) and also at 1/60. At 1/100, there seems to be no flicker but the flicker starts again at 1/125 and gets more pronounced as the shutter speed increases. The results looks similar using the higher resolutions of 1920x1080, 60 fields/s(60i) and 1920x1080, 60fps (60p) though the flicker is now faster and the best shutter speed to use appears to be 1/100s in all the resolutions.
In practice, I don't see much flicker using the auto mode since I suppose the shutter speed used is 1/125 or lower and we don't normally shoot directly at the lights. Further more, fluorescent lights are now replaced more and more by energy saving lights so there are less chance of flickers while filming. If it is necessary to avoid or at least to reduce flicker, then set a shutter speed of 1/100s manually.
Below is a composite video of clips shot during my visit yesterday to a shopping mall showing the local Christmas spirit. All taken on auto indoor and totally hand-held with no sign of any flickering (probably no fluorescent lights were present). There is some sign of shakiness in the second last clip (dancers on stage) that employed fairly high zooms; otherwise not too bad for hand-held shots. I'll like to wish everybody a Merry Christmas and a Happy New Year with this video.
(Sorry, having problem to upload this second video in Youtube, will post again once OK. I am releasing this post without the video since Sergei seems to be desperate to have the flicker test result.)
Edited on 23 December, morning. This video is now uploaded at Vimeo here. The last song is complete in the original but the last few seconds were truncated during upload so hearts were lost! Merry Christmas, anyway!
Edited on 23 December, evening. At last, the video is uploaded in Youtube. Originally shot in 1920x1080, 30p but rendered to 720x480 for Youtube. This version is about 3 seconds longer than the one in Vimeo and is thus complete and more satisfying. Not sure if the missing seconds is due to Vimeo or to my line during upload. Nevertheless, Merry Christmas. Enjoy!
Ronald Kwok
http://ronaldkwok.atomicblog.hop.clickbank.net/
Sunday, December 6, 2009
Using External Hard Drive - Caution
"PartitionMagic has detected an error 110 on the partition starting at sector 63 on disc 2.
The length of the partition in the partition table is incorrect. The CHS length is 1250274627, the LBA is 1250263665, and the File System length is 1250263665. PartitionMagic has determined that the length can be changed to the correct value of 1250274627. Would you like PartitionMagic to fix this error?"
Without giving it a second thought, I hit the Yes button and that was a BIG mistake. However when I tried to create a new partition, it came up with another error message (error #2103) that a new partition cannot be created. So I just left it at that.
But horror of horrors, when I later tried to access the Maxtor with my HD2000 the dreaded message "Hard disk unavailable, would you like to format the hard disk?" (or something similar to that effect) appeared. Oh gosh, it seemed I have now lost all my videos! As a last resort, I hook up the Maxtor to my laptop and thank goodness, I could still access all the files there and open them. So the videos were still intact, only problem was that they could not be accessed by the HD2000. The only solution was to transfer all the files in the Maxtor to another hard disk and reformat the Maxtor using the camcorder. This I did and luckily there was only 130GB of data to be transferred.
Thus it appeared that by fixing the "error", Partition Magic has made the Maxtor HDD inaccessible to the HD2000 but luckily it was still accessible through Windows. I didnt' know what that error message mean but it must be something that help identified the Maxtor when the HD2000 is connected. Having transferred all the files to another HDD, the next step was to reformat the Maxtor by the HD2000. After this was done, the Maxtor was again functioning as normal. The final task was to transfer all the files from the temporary HDD back into the Maxtor.
This was quit easily done since I sorted my clips by date whenever I transfer them from the HD2000 to the Maxtor and the videos were store in individual folders named for the date e.g. 20090629 for clips captured on 29 June. All these date folders were stored under an ASSETS folder. First I transfer videos from a SDHC card to the reformatted Maxtor to create the proper setting. Then I just drag and drop each date folder from the back-up HDD into the Assets folder in the Maxtor. (You could just drag and drop the whole Assets folder but since it is rather big, I prefer to do it in small chunks.) This took some time though since there was about 130GB of data to be moved. What a relief when all was done and I found everything working as before.
Lessons to be learned? Well, never tamper with your Xacti Library Hard Disk (the one that is formatted by the HD2000 to store your videos) , especially the partitioning setting. In any case, I could not create a new partition with Partition Magic despite correcting that "error" and probably not with another partitioning programme. Correcting the "error" made the Maxtor invisible to the HD2000. If you want to use the free space, just create a new folder and it could be accessed by Windows but ignored by the HD2000.
Phew, what a narrow escape!
Ronald Kowk
http://ronaldkwok.atomicblog.hop.clickbank.net/
Thursday, October 15, 2009
Upgraded Sanyo HD2000A with iFrame
So what is the common factor here? You've guessed it, both the new Sanyo camcorders records videos in the new iFrame format. Calling this an upgrade may not be appropriate as the iFrame format has a resolution of only 960x540, exactly a quarter of the HD 1920x1080 format so it is actually moving backwards as far as resolution goes. But being able to do something that cannot be done before is an upgrade, right?
Anyway, this will probably only excites Mac users since they will be able to edit iFrame videos using iMovie. Here's part of the blurb from Apple, "The iFrame Video format is designed by Apple to speed up importing and editing by keeping the content in its native recorded format while editing. Based on industry standard technologies such as H.264 and AAC audio, iFrame produces small file sizes and simplifies the process of working with Video recorded with your camera."
On the Sanyo site, it says "iFrame is a computer-friendly video format that has been specifically designed to simplify the process of working with video recorded from a camera. With iFrame, the video recorded in the camera is in the same format that will be used for editing, which means that importing video is fast and file sizes are small. This translates to quick and easy editing and sharing of movies across multiple platforms and devices."
Isn't this marriage made in heaven? BTW, both the Sanyo camcorders defaults to the iFrame resolution so it cannot be any simpler for Mac users and this sticker below is also stuck on the camcorders. Currently only these two camcorders support the iFrame format so it is another scoop for Sanyo since Sanyo is still the only consumer camcorder with 1920x1080, 60p videos.
Friday, October 2, 2009
Display Information
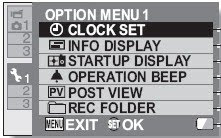
Under the Options Menu 1 (accessible when switch is at either REC or PLAY position), there is a INFO DISPLAY setting when you can select options to display or not the Date & Time and Counter information during Playback of the videos. This is useful when you do not want other information cluttering the screen during playback of the video.
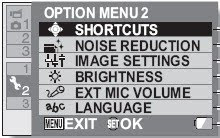
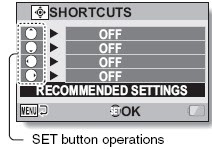
The other (hidden) display option can be accessed only from the Shortcut setting screen at the Options Menu 2.
Saturday, August 15, 2009
Stills from videos and slow motion playback
Here is the link to the latest video on Vimeo.
The Sanyo marketing department has been highlighting the Xacti series as a dual camera implying that the still photos are as good as the videos. The HD2000 will produce still photos of up to 12M resolution but they somehow do not look that striking to my untrained eyes.
Anyway, lately I discovered that I can get very good stills by capturing the frames from a video, even though that they are just 2M resolution, taken from 1920x1080 mode videos. (These are good "capture the moment" for me, just for casual viewing but maybe not good enough for professional photographers! They would be using dedicated cameras or DSLR's anyway.) Thus there is no need to be distracted to snap photos while recording your video, you can get your stills from the video itself. From my playing around so far, I found that the best stills can be taken from the video shot at the highest resolution of 1920x1080, 60p and 30p. Those shot at 60i will yield shots that are ghosted for moving subjects and those with panning actions. Of course those taken in bright sunlight will fare better as well.
Here are some examples.
The first two below are taken from videos shot at 60p.
The next two below are from video taken at 30i. The first picture shows ghosting of moving flag and the second shows ghosting while panning.
Wednesday, July 29, 2009
Edit Functions in HD2000
This is where I use a lot of the built in editing functions of Cut and Join in the HD2000. At times I just wish there is also an "Unjoin" function and that would make it complete. Before I proceed to describe the two built in editing functions, here is the link to my latest video uploaded in Vimeo. This one was taken in a public park at the foot of the Pamukkale travertine in the early evening. As most of the park was in shade, it was a good test of the HD2000 as my wife zoomed and panned all over the place from the sunlit travertine to the shaded stream, the open sky to the shimmering water of the lake; the distant trees to a close-up of the ducks and everything else in between. There was also the walking shot as she approached the lake. So you can see how the HD2000 performed in the changing conditions.
Here is the Vimeo link, http://www.vimeo.com/5798898
Despite all the bad press of the poor Image Stabilisation, I think the HD2000 did reasonable well as the shots were completely hand-held and unprocessed. But you can see the auto exposure, auto focus and auto White Balance hard at work as the lighting conditions changed rapidly. It seems a bit slow but it gives that artistic feel.
OK back to the editing functions. There are just two of them - Cut and Join.
The Join function is to join several videos into one big video and the limit is that you can only join a maximum of 9 clips at any one time and the 4GB file size limit also applies. You just simply select the clips to join in the order you want by pressing the Set button and numbers will appear on the clips that are selected so that you see if that is the right order.
Then you press the Record button to save the joined videos and you have a choice to save it as a new video or overwrite the existing videos and you can view the joined videos before actually saving it.
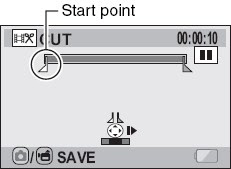
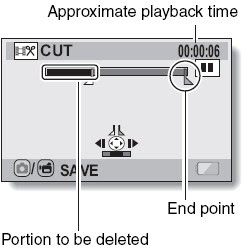
The next is the Cut function. As this is very basic, you can only set two cut points.
Wednesday, July 22, 2009
HD2000 as a card reader
Other functions under the USB Connection for Computer are MTP (for Vista), Screen Capture and PC Camera.
I tried copying different types of files to the SDHC card and it works but when you you want to play back the files with the camcorder, it must be of the same mp4 format and has the file name SANYxxxx.mp4 where xxxx can be any number. One video clip is just one mp4 file so it is very easy to archive your files on the PC and to copy old files to play back on the HD2000. This is a quick alternative to using the XACTI library when you have a PC around.
For this week's video on Vimeo, I have uploaded a clip taken at an indoor stadium where a few kindergartens (including the one my grandchildren attend) were having their joint sports day.
This is from one of the kindergartens where the performance was easily the best among those taking part. Though some of the kids were out of sync, it was even more fun to watch. Hope you'll also enjoy the video.
This was taken with the HD2000 on a tripod, zoomed and panned. Unfortunately the tripod was not of very good quality (it came free with the camcorder) and the horizontal panning was very jerky. So I learn the first rule of choosing a tripod - make sure the movements are smooth in all directions. The built-in mic also did pretty well as it captured both the very loud music and also the voices of the kids, with no distortion.
Here's the Vimeo link to click on.
Happy viewing.
Ronald Kwok
http://ronaldkwok.atomicblog.hop.clickbank.net/
Wednesday, July 15, 2009
Video sample in mixed lights
Here's the link, http://www.vimeo.com/5592162
One thing I discovered when editing my videos using the built-in cut and join functions in the HD2000 is that you cannot join videos taken with different resolutions. I am not sure if it is the same using external editing program. However, there is no problem when I burn videos on DVD (SD quality) using Nero Visions; I could mix all the different resolutions and can burn them onto one DVD. I suppose this is because they are all down converted to one common file type.
Another thing I found out is that the camcorder (actually the battery) gets quite warm if used continuously and it will not charge when plugged into the docking station. The indicator light on the camcorder will flash red and it will only charge after it has cool down. The light is a solid red when the battery is charging so this is one of the safety feature that prevents the battery from over-heating. So don't panic when you see the flashing red light, just cool it!
Ronald Kwok
http://cbpirate.com/s/cbp/ronaldkwok
Thursday, July 9, 2009
Video taken in bright outdoor light - Turkey
http://vimeo.com/5500486
But it took so long to upload and even longer for the conversion before it appeared in Vimeo for download. The most frustrating part was that I had to try uploading several times when the process hanged. I suppose that is because it is a free account and it would be faster (at least for the conversion) if it was a paid account. So there is a price for everything.
Some notes on the video. It was shot in 1920x1080, 30p; totally hand-held and no processing apart from simple cuts and joints. I uploaded it directly into Vimeo so I do not know if the Vimeo conversion has any effect on the video quality. Comments are welcomed.
Happy viewing.
Ronald Kwok
http://ronaldkwok.atomicblog.hop.clickbank.net/
Tuesday, July 7, 2009
The 4GB file limit test - retest and updates
Since the last time I used a Kingston class 4 card for my test, I did the same test again using a Transcend class 6 card. The result I got proved the above theory since the gap was only 5 seconds compared to 10 seconds the last time. Out of curiosity, I repeated the test again using the class 4 card and the results surprised me.
No, it is not because the gap was shorter than using the class 6 card but because it was shorter than what I measured the last time. This time it was only 7 seconds compared to 10 seconds previously! Not sure if this was the SDHC card itself that affected the results, I repeated the test again with my 2 other Kingston class 4 cards. The results were very similar, one also gave 7 seconds and the other, 8 seconds. For some unknown reasons, the gap is somehow shorter than when I tested it the last occasion. I can only suspect that the cards are now more seasoned after being in used many times and the read/write is a bit faster. Who knows?
To confirm the results, I tested using the Transcend class 6 card again. The result was, thank goodness, consistent at a 5 seconds gap.
For those of you wondering, this is how I did the test; nothing elaborate but something very simple and which I think is fairly accurate. I left the camcorder to run on recording and when the end of file countdown come on, I video the Windows clock. Thus it will show the time the recording stop and also the time when the next video starts again. The difference in the two times captured on video will be the gap. There is a possible error of +- one second but good enough for this purpose.
BTW, there are also slight differences for the length of the video of the 4GB video among the cards used and it ranges from 23:39 to 23:48 using just the length of the video shown on the video playback listing screen.
To sum it up, these are my findings. You'll be the judge to say whether it is conclusive or not.
1. There is a gap between the end of the first 4GB file and the start of the next 4GB file.
2. Using the higher class 6 SDHC card will reduce this gap as compared to a class 4 card which is about 5 seconds as compared to about 7 seconds from the test carried out
3. The length of the video at 4GB also varies slightly depending on the card in use and ranges from about 23 minutes 39 seconds to about 23 minutes 48 seconds.
4. Use a class 6 SDHC card as far as possible.
If you are recording a long video that may exceed the 4GB limit and knowing the above figures, it is best to stop the recording manually at a suitable time before it stops automatically in order not to miss out any critical moments that you wish to capture, should they occur during the gap.
I believe this gap will also occur in all camcorders that uses the FAT32 file system but it may vary for the different brands.
Happy shooting.
Ronald Kwok
http://cbpirate.com/s/cbp/ronaldkwok
Friday, July 3, 2009
First video at Vimeo
So at last you will get to see some videos on this Blog. I just joined Vimeo, a video hosting site, this morning and I uploaded my (or rather my wife's) first video in Vimeo. Since mine is a free account with Vimeo, I can only upload one HD video a week and for my first upload, I have chosen one clip taken in a restaurant in Cappadocia, Turkey during my recent visit there. This was taken in low-light to demonstrate the capability of the HD2000 in this area. The upload was very S-L-O-W and that 2 minute clip took more than 2 hours so I don't know if this is normal or it is because of my slow laptop, my bad line or both.
As most of us know, all the HD camcorders performs pretty well in bright, outdoor lighting; it is only in low light and indoor lighting that we separate the men from the boys. I believe the HD2000 didn't fare too badly and stood among the men as I am more than happy with the result for the money I paid for the camcorder.
The video was shot using 1920x1080, 30p rather than at the highest resolution since it would be easier to edit later on. The camcorder was totally hand-held and set to fully auto mode. No processing was done except for trim and join and hence the raw audio. Comments are most welcomed.
The link for the video is http://vimeo.com/5432398
Enjoy.
Ronald Kwok
http://ronaldkwok.atomicblog.hop.clickbank.net/
Monday, June 29, 2009
Hidden functions of HD2000
The shortcut function in the Option Menu 2
Out of these, the AF Lock, AE Lock, Exposure Compensation and Display on/off cannot be found on the normal menu and thus are only available when set as one of the shortcuts. Unfortunately, most of the functions can be set only before recording and are thus only useful for taking still photos rather than videos. Nevertheless, it is better than not having any manual settings at all. Once recording has started, you cannot make any changes with these shortcuts exception for the AF Lock and the AE Lock. These two can be toggled on and off individually or in combination while recording.
Ronald Kwok
http://cbpirate.com/s/cbp/ronaldkwok
Wednesday, June 10, 2009
Using the HD2000 with external HDD on the road
Here's my experience with using the HDD on the road with the HD2000. First it worked as advertised, but there are a few points to note.
1. You need to have two power points near to each other since you need one for the HD2000 via the docking station and another one for the HDD.
2. Make sure your transfer your SD cards in the chronological order that they were used or your files will be copied in the order that they are transferred. If this happens, you can correct it later by changing the file number in the correct sequence by opening you HDD in Windows.
3. Change you camcorder's time to the local time (if there is a time difference) or you may be confused later when working with your videos by the time-stamp
Here's my workflow to handle the vast number of clips taken. Make sure all the clips are already transferred to the HDD for storage. Format a SD card and copy a day's video or up to 4GB worth of videos from the HDD back to the SD card. Delete unwanted clips and use the HD2000 built-in editing function to cut or join the remaining clips as required. Transfer the edited clips back to the HDD for storage and later further action when I have a more effective software to handle the HD2000 clips.
The manual is not very clear on how to transfer videos from the HDD to SD card. This is the procedure.
Under Xacti Library Menu, select Select Play File and choose either Library Roll or Library Calender. Then go to Playbcak Menu2 and select Copy. You will then come to the Harddisk to Card screen where you can select how you want the files to be transferred - single, selected or all.
I am more than happy with the performance of the HD2000 thus far, apart from the poor IS at zoom. More on this later.
Ronald Kwok
http://ronaldkwok.atomicblog.hop.clickbank.net/
Thursday, May 21, 2009
The 4GB file limit test
Meanwhile I did a test on the 4GB file limit and the gap between files. This 4GB limit arose because the SDHC cards are formatted in FAT32 and 4GB is the largest file that the system can handle. (This is also true of all other camcorders that uses the same file system.) Once the video reaches 4GB during recording, it will stop and the file is saved and recording then continues with a new file. This is all done automatically and will continue until the recording is stopped manually or the card capacity limit is reached.
This is what I found out for the HD2000. There is a 30 seconds countdown counter in red on the LCD screen before the 4GB limit is reached. The gap between files (end of the first file to the beginning of the second file) is about 10 seconds in my measurement. These files are marked with a special icon in the playback selection screen and during playback they are continuous, i.e. it moves from one file to the next without stopping, like one continuous file. In fact using the fast forward and reverse will move across files as if they are one continuous file but each file has a separate name.
Hope this is of help to those interested in these details.
Ronald Kwok
http://cbpirate.com/s/cbp/ronaldkwok
Monday, May 18, 2009
Comparing with Sanyo VPC FH1
However there are some other differences which may be of some importance for those deciding on which camcorder to pick. I could not find a detail review of the FH1 but the following are the major differences that I can find when looking at the specifications sheet of the FH1 and comparing with my HD2000. This is not exhaustive and readers may point out other differences or errors if there are any.
In all cases, the HD2000 is quoted first.
1. Size and form
90 (W) x 54.5 (D) x 112.6 (H) mm, volume about 272 cc
53.3 (W) x 105 (D) x 57.3 (H) mm, volume about 253 cc
2. Weight (with battery and SD card)
311 gram
342 gram
3. LCD monitor
2.7" (230,000 pixels)
3.0" (230,000 pixels)
4. Lens
Focal length, f=6.3mm to 63.0mm
Aperture, F=1.8 (wide) to 2.5 (tele)
Focal length, f=5.95mm to 59.5mm
Aperture, F=2.0 (wide) to 2.8 (tele)
5. Interface
Via docking station.
Directly on camcorder body.
6. Microphone
Built-in plus external input terminal.
Built-in only.
7. Headphone terminal
Yes
No
8. Filter size
40.5mm
37.0mm
9. Shoe mount for external devices
Yes
No
The rest of the specifications for both the camcorders are identical as far as I can see. Owners of FH1 may want to point out other differences or make corrections in case of errors. Cheers.
Ronald Kwok
http://ronaldkwok.atomicblog.hop.clickbank.net/
Wednesday, May 13, 2009
SDHC card classes
(The following information are taken from Wikipedia.) The SDHC cards have different grades or classes depending on the speed or data transfer rates with the minimum speed below (and the minimum equivalent x-rating.)
Class 2 - 2MB/s (13x)
Class 4 - 4MB/s (26x)
Class 6 - 6 MB/s (40x)
In the HD2000 manual, the class of acceptable SDHC cards are not mentioned but I read somewhere in one of the forums that Class 4 is the minimum recommended for the highest resolution videos. You can use a class 2 for some of the lower resolutions but why take chances? Go for the Class 4 at least or Class 6 if cost is not a major issue.
This is specially for readers in Malaysia. I was in Low Yat Plaza the other day and I noticed that the various brands of SDHC cards on offer have the class as indicated below.
SanDisk - Class 2
Kingston - Class 4
Transcend - Class 6
They may have the other classes available as well but these were those on display. So be careful and check the class of the SDHC card before you part with your money. The class is indicated on the card itself, example below.
http://cbpirate.com/s/cbp/ronaldkwok
Tuesday, May 12, 2009
Xacti Library and External Hard Disk
When the provided USB converter cable was connected to the docking station, the Xacti Library screen came on. As the HDD was not turned on, the following message appeared.
"HDD not on, disconnect converter cable if not using Xacti Library."
Once I turned on the supply to the HDD, the Sanyo offered to Format the hard disk. This was because the Maxtor HDD came preformatted in NTFS and the Sanyo can only work with the FAT32 format. The formatting took about one minute.
One this was done, I was able to transfer files from the SD card to the HDD. The process was a bit slow. In the case of a 8GB card, it took about 15 minutes for the actual file transfer and another 20 minutes for some processing; the screen says Sort by Date but dunno why it took so long. Anyway, it worked.
You can watch the proceedings from the LCD screen or from a TV if one is connected. One use of this will be if you are on a long holiday, you can bring along an external HDD and after a day's shooting, transfer all the videos from the SD cards to the HDD in the hotel and reuse the emptied SD cards for the next day. In this way you do not have to carry too many SD cards and the cost of a HDD is much cheaper than getting the equivalent capacity of SD cards and it is much easier to manage. The only downside is that you need an external HDD that is self-powered and thus only the 3.5 inch HDD can be used. It will be more convenient if the USB powered 2.5 inch HDD can be used.
You can watch any files from the HDD and also create and edit albums for playback. Files can also be copied from the HDD to the SD card for basic in-camera editing.
Here are the specs for an external HDD that can be used.
1. USB 2.0 compatible. 2. Powered by self power. 3. FAT32 format only. 4. A maximum capacity of 1 TB.
Looks like I need to carry some extra load for my trip to Turkey later this month. Sigh.
Ronald Kwok
http://ronaldkwok.atomicblog.hop.clickbank.net/
Saturday, May 9, 2009
Photo mode on HD2000
I am not too concerned about this since the main purpose of my HD2000 is for video and not for the photos. As in all camcorders, I presume you can capture shots while shooting a video without pausing. It may be better to use the remote control unit that comes with the HD2000 for this purpose since pressing the photo button on the camcorder itself while recording may shake it a little if you do not have steady hands.
The only dock function that you can do on the HD2000 itself without the dock is charging the battery inside the unit by connecting the AC main to the DC-in using the AC adaptor. All other connections to the outside world (TV, PC, external HDD, etc) must be done via the docking station. All connecting cables are supplied except for the HDMI cable and this is the normal size cable and not a mini HDMI as used by some other camcorders. Note that you need to purchase a separate battery charger if you want to charge the battery outside the camcorder.
Hope this answers some questions viewers may have.
Ronald Kwok
http://cbpirate.com/s/cbp/ronaldkwok
Wednesday, May 6, 2009
Burning DVD's and File size
After selecting the videos to be burned, the program determined that most of the videos were in NTSC format and offered to use this format rather than the default PAL. Since my TV system is using PAL, I stuck with PAL. Half an hour later, I had my first DVD at my first attempt, thanks to my LG DVD burner. I then tried it on my DVD player with my PAL TV and I found the video rather jerky. I read in some forums that conversion from one system to another will result in this jerkiness and they are right. So I burned the same videos again, this time using the NTSC format. The results were better and smoother than the one done in PAL. However, the video quality was not as good as when watching directly from the videocam. Later I found out that the DVD videos were burned with a resolution of only 720x480 with a frame rate of 30 fps.
I am not sure if this resolution is a standard for videos burned onto DVD or there are other DVD burning programmes with a higher resolution. Thus there is still a lot to learn about this subject.
These are my preliminary opinions and findings after playing with the Sanyo VPC HD2000. The video quality is great if your watch it on HDTV; there is no problem to watch the video on older type of TV but the quality would only be as good as that of the TV. It is easy to just drag and drop the video files from the videocam to a PC, since the files are in MPEG4 format.
However, not many programs can play these files, especially at the highest resolution and you will need a high-end PC to play these videos satisfactorily even if you have the right software. (BTW, I upgraded my PC memory from 1G to 3G RAM but the result of playing the video on Nero Showtime was the same, still jerky at the highest resolution. This means I would need to upgrade to a faster processor or need a dedicated graphic card or both if I want to watch these videos on my PC or shoot at a lower resolution.) As for my Lenovo S10, it can handle only the 640x480 resolution, beyond that it is all jerky. There's no problem to burn the videos onto DVD but at a lower resolution and quality.
I suppose all these points are also applicable to other HD videocams since this high quality is too much for normal PC and software to handle. You need to have a high-end PC to run these video effectively. And the files size of these video are huge. Here are sample sizes of the video files for the various resolutions for a one minute clip each. The names are those used by the HD2000.
TVSHQ - 640x480, 30fps (30p) 23.2M
HDSHQ - 1280x720, 30fps (30p) 62.4M
FULL SHQ - 1920x1080, 30 fps (30p) 89.1M
FULL HD - 1920x1080, 60 fields/s (60i) 117.9M
FULL HR - 1920x1080, 60 fps (60p) 175.2M
The manual also lists the recording time for various sizes of SD card. For a 8GB SD cards, the times are as below.
TVSHQ - 5hr 32min
HDSHQ - 1hr 50min
Full SHQ - 1hr 27min
Full HD - 1hr 5min
Full HR - 43min 50sec
You will need a lot of SD space to shoot your videos at the higher resolutions and I suppose this is the price of quality! I believe this is also true of other makes of videocam with full HD and not just for the Sanyo HD2000.
Thus it is a good thing that you can connect an external HDD (Hard Disk Drive) directly to the HD2000 via the USB port for storing and managing your library of video files without the need of a PC. I am not sure if this function is also available in other makes of videocam. This will be great if you are travelling and you need not invest in too many SD cards. I will detail my experience on this function in my next post once I get hold of a suitable external HDD.
Ronald Kwok
http://ronaldkwok.atomicblog.hop.clickbank.net/
Saturday, May 2, 2009
Impressed by First Impression
My wife spent the Sunday trying out her new toy. I was pleasantly surprised by my wife's video shots since this is her first videocam and the videos look great. She took both indoors and outdoors shots (during the day) and output was clear and smooth. The video quality is definitely very good.
I shot some videos using super macro mode (that can go down to 1cm) on flowers and they look good and the auto focus picked the right subjects most of the time but in a few cases it focused on items in the near background. When closing in, you can see the focus changing and settling on the right subject. I tried the zoom but the result is shaky especially at the maximum end of the 10x optical zoom. This is the main weakness of the Sanyo, the unstable EIS. You'll need a tripod if you need to zoom with the Sanyo.
Color was very natural under normal daylight.
The built-in mic was very sensitive and the audio output was realistic and life-like with very little noise. During playback, I was transported back to the scene of the video.
When browsing at some of the forums, I saw a number of concerns on how the video will playback on TV because of the PAL/NTSC systems, the frame rates used and the different frequencies employed. Have no fear, I tried playback on both my analogue and digital TV and both were smooth with perfect audio sync. Of course, the quality of the videos depends on the quality of the TV used. I used the supplied S-AV cable to connect the Sanyo to my old CRT TV and the component cable to connect to my Sharp LCD TV. Also used a standard HDMI cable (not supplied) to connect the Sanyo to the Sharp LCD TV. BTW, all connections are via the docking station as shown below.
You have to set the TV Output options to suit the TV to be used for viewing.
I tested using a CRT TV with 4:3 format under PAL to display the highest HD mode of 1920x1080 (60p) without any issues. You need to select the recording resolution if you use the component cable and using the HDMI is easier by just selecting auto and the output will match the recording mode used. My LCD TV is not full HD, just 1368x768 and so it can go to 1080i only but playback was no issue.
The problem is viewing on the PC. The video is recorded using MPEG4/H.264 (whatever that means) and not many media player can playback MPEG4 files. One of the software provided with the Sanyo is Nero Showtime 4 and I used this to view the videos. Those recorded at 1920x1080 (60i), the second highest resolution, playback without problem but those at the highest resolution of 1920x1080 (60p) was jerky on my desktop. I suspect that there's not enough RAM memory for this task since there is only 1G RAM. I will test again later when I increase the RAM. (Apple Quicktime showed only colour pixels!)
Friday, May 1, 2009
Why I choose Sanyo VPC HD2000 videocam
Apparently she has told my elder daughter who has a friend whose father owns a camera shop and the friend has recommended the latest Sanyo Xacti videocam, the VPC HD2000. She told my daughter that this is a craze in Hong Kong and she will give us a good offer when she has her warehouse sale later in the month. (Maybe her company is the distributor for Sanyo stuff!) This model is apparently the only consumer videocam that has progressive HD recording currently. (The stuff that says 1080p instead of 1080i which is supposed to be twice as good!) Since my daughter is always looking for the best, she convinced my wife that this is the videocam to buy.
I know Sanyo make fridges and other electrical goods but don't remember them selling any cameras, let alone videocams. Of course I was very skeptical about this and I went around looking at the camera shops. All the videocams I saw were Canons, Sonys, Panasonics, JVC or even Samsungs but no Sanyos and finally I found only one shop selling this model. So I googled and was presently surprised that Sanyo do make videocams and this model is getting some good reviews as well.
This is an unconventional shape, very much like a slightly oversized shaver or a mini hair dryer. They call this the pistol grip since you will aim and shoot your video just like you aim and shoot with a pistol. Sanyo has been producing this style of videocam for a number of years but this is their first progressive HD model which replaces the earlier HD1000 and the HD1010 which came out late last year.
This post will be purely on my point of view as a user and not on the technical aspects. The most complete review so far for the HD2000 is to be found at the camcorder info site here and my post will mainly cover items not touched by this review plus my views on the items covered as an end-user. Since this is my first videocam, I have no previous experience or videocam to compare with and my comments may be very subjective.
To cut this intro short, I went ahead and bought the Sanyo VPC HD2000 as an advanced birthday present for my wife last weekend so that she can get some practice using it before our holiday in Turkey later in May (if the swine flu has not stopped the world by then.) Below is a shot of my latest desktop with the unholy trinity of Lenovo S10 netbook, Sharp HD (ready) LCD TV and the latest Sanyo HD videocam as each has its own Blog. Will they work together? I'll soon find out. You can see their relative sizes in this shot; the Sanyo videocam is sitting in the docking station.
Actually, the trio are only together for the shots since only the Sharp LCD TV is mine that belongs to my desktop; the Lenovo S10 and the Sanyo videocam belong to my wife but I will be borrowing them from time to time for testing and writing this and other Blogs. I use a Dell Inspiron for my normal work.
I decided to buy the Sanyo because of some good reviews that I have read. Though it is not the best in the market, it is good value for money with the features that it has. Sure, you can get better videocam but at a much higher price. Actually the main reason is that my wife has more or less made up her mind on this model so if I get her anything else she would not be happy inside. Thus to keep her happy so that she will not make me unhappy, I took this model. Ladies sure have their way around, sigh.
Anyway, stay tuned.
Ronald Kwok
http://cbpirate.com/s/cbp/ronaldkwok